Dreaming of entertaining friends and family in a stylish outdoor kitchen, but worried about the hefty price tag? You’re not alone. The average outdoor kitchen costs between $6,000 and $25,000, but with some creative thinking and DIY spirit, you can build an impressive cooking space for a fraction of that cost.
This Website contains affiliate links. That means I may earn a small commission if you purchase through my links, at no extra cost to you.
As a homeowner who transformed my backyard on a tight budget, I’ll walk you through practical steps to create your own outdoor kitchen DIY on a budget. From smart planning to material selection and construction tips, this guide will help you build a functional outdoor cooking area without emptying your wallet.
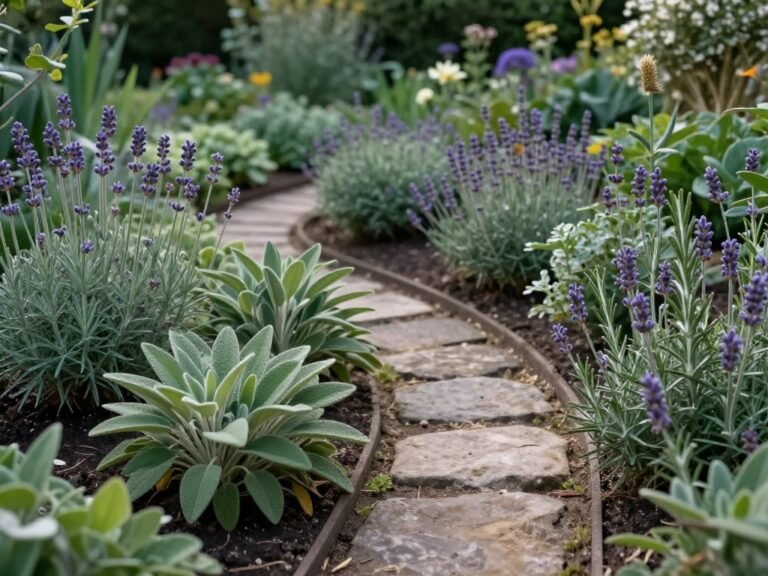
A beautiful DIY outdoor kitchen that looks expensive but was built on a budget
Planning Your Budget Outdoor Kitchen: First Steps
Before grabbing your tools, proper planning will save you both time and money. Let’s break down the essential considerations for your outdoor kitchen project.
Assessing Your Space and Needs
Start by evaluating your available outdoor space. Measure the area where you plan to build your kitchen and consider factors like proximity to your house, existing utilities, and traffic flow. A well-planned layout makes cooking and entertaining more enjoyable while maximizing your budget.

Related Posts:


Carefully measuring your space is the first step to a successful budget kitchen build
Ask yourself these key questions:
- How often will you use the outdoor kitchen?
- What type of cooking do you enjoy most (grilling, pizza, smoking)?
- How many people do you typically entertain?
- Do you need protection from the elements?
- What utilities are already available nearby (water, gas, electricity)?
Pin this planning checklist for later reference when you’re ready to start your project!
Essential vs. Nice-to-Have Features
The secret to staying on budget is distinguishing between must-haves and luxuries. Focus on the core components first, then add extras later if your budget allows.
Essential Components:
- Cooking surface (grill or cooktop)
- Counter space for food prep
- Heat-resistant surfaces
- Basic storage
- Weather-resistant materials
Nice-to-Have Features:
- Refrigerator or ice chest
- Sink with running water
- Pizza oven
- Bar seating area
- Overhead structure
- Specialty lighting
Ready to Start Planning?
Find affordable outdoor kitchen design inspiration and planning tools on Amazon!
Budget Breakdown: How Much Will Your DIY Outdoor Kitchen Cost?
Understanding potential costs helps you set realistic expectations and identify areas where you can save. Let’s break down typical expenses for a DIY outdoor kitchen project.

Typical cost breakdown for a budget DIY outdoor kitchen project
| Component | Budget Option | Mid-Range Option | Average Cost |
| Base Structure | Cinder blocks, repurposed cabinets | Modular frame kit | $200-$800 |
| Countertop | Concrete, tile, sealed wood | Granite remnants, outdoor-rated laminate | $100-$600 |
| Grill/Cooking Surface | Basic propane grill | Built-in gas grill | $300-$1,200 |
| Storage | DIY shelving, repurposed cabinets | Outdoor-rated cabinets | $100-$500 |
| Utilities (if needed) | Minimal – propane tank, no plumbing | Basic gas line, simple water hookup | $200-$1,000 |
| Extras (lighting, seating) | Solar lights, repurposed furniture | Basic electrical, simple bar seating | $100-$500 |
| Total Range | Basic Setup | Enhanced Setup | $1,000-$4,600 |
Money-Saving Strategies
With some creativity and strategic planning, you can significantly reduce your outdoor kitchen costs:
Top Budget-Saving Tips
- Repurpose existing materials and furniture
- Shop sales, clearance events, and second-hand markets
- Build in phases, starting with essentials
- Choose durable but less expensive materials
- Position near existing utilities to minimize installation costs
- Use modular components that can be expanded later
- DIY what you can, hire professionals only when necessary
Budget Pitfalls to Avoid
- Skimping on weather-resistant materials
- Overlooking proper foundation requirements
- Ignoring local building codes and permits
- Purchasing low-quality appliances that won’t last
- Underestimating utility costs (gas, water, electric)
- Over-complicating the design unnecessarily
- Not planning for adequate counter space
Find Budget-Friendly Materials
Browse Amazon for affordable outdoor kitchen materials and save big on your project!
Choosing Budget-Friendly Materials That Last
The materials you select will significantly impact both your budget and the longevity of your outdoor kitchen. Let’s explore affordable options that don’t sacrifice durability.

Budget-friendly materials that stand up to outdoor conditions
Base Structure Options
The foundation of your outdoor kitchen doesn’t need to be expensive to be sturdy and functional:
Concrete Blocks
Inexpensive, durable, and easy to work with. Can be stacked and secured with construction adhesive to create a solid base. Paint or face with stone veneer for a more finished look.
Cost: $1-2 per block
Wood Frame
Pressure-treated lumber creates a lightweight, adaptable frame. Must be properly sealed and protected from the elements. Good for raised or portable kitchen designs.
Cost: $100-300 for materials
Repurposed Cabinets
Secondhand indoor cabinets can be weatherproofed with marine-grade sealant or paint. Check thrift stores, habitat restore, or online marketplaces for deals.
Cost: $0-200 depending on source
Build Your Kitchen Base
Find affordable building materials for your outdoor kitchen structure!
Countertop Materials
Your countertop needs to withstand the elements while providing a functional work surface. These budget-friendly options offer durability without breaking the bank:

Installing a DIY concrete countertop – affordable and durable
Concrete
Extremely durable and customizable. Can be poured in place or created as slabs. Add color pigments or embed decorative elements for a personalized look. Requires sealing.
Cost: $100-300 DIY
Ceramic Tile
Weather-resistant and available in countless styles. Install over cement board for a durable surface. Choose frost-resistant outdoor tiles and waterproof grout.
Cost: $100-250 for materials
Sealed Wood
Butcher block or marine-grade plywood can work if properly sealed with weather-resistant finishes. Requires regular maintenance but offers warm aesthetic appeal.
Cost: $150-300 for materials
Create Durable Countertops
Find everything you need for beautiful, weather-resistant countertops!
Step-by-Step DIY Outdoor Kitchen Construction Guide
Now that you’ve planned your kitchen and selected materials, it’s time to build! This step-by-step guide will walk you through the construction process.

The progression of a DIY outdoor kitchen from foundation to finished product
Step 1: Prepare the Foundation
A solid foundation ensures your outdoor kitchen will remain stable for years to come:
- Clear and level the area where your kitchen will be built
- For permanent installations, consider pouring a concrete pad (4″ thick minimum)
- For installations on existing patios, ensure the surface is level and can support the weight
- Mark the outline of your kitchen layout with chalk or spray paint
- Check measurements twice before proceeding
Foundation Materials
Find everything you need for a solid outdoor kitchen foundation!
Step 2: Build the Base Structure
The method will vary depending on your chosen materials, but here’s a basic approach using concrete blocks:

Building a sturdy base with affordable concrete blocks
- Lay the first course of concrete blocks following your marked outline
- Check that blocks are level both horizontally and vertically
- Apply construction adhesive between courses for stability
- Continue stacking blocks to your desired height (typically 36″ for countertop height)
- Create openings for grills, storage components, or other appliances
- Reinforce with rebar if needed for additional stability
Pin this concrete block layout guide for reference during your build!
Step 3: Install Utilities (If Applicable)
If your design includes gas, water, or electrical components, now is the time to install them:
- Gas lines: Always hire a professional for safety unless using propane tanks
- Electrical: Install weather-rated outlets and lighting according to code
- Water: Consider using a garden hose connection for simplicity, or proper plumbing for permanent installations
Safety First: Always check local building codes and obtain necessary permits before installing utilities. Gas and electrical work often require licensed professionals.
Step 4: Create Countertops
For a budget-friendly concrete countertop:
- Build a form using melamine-coated particle board
- Apply silicone caulk to the inside corners for rounded edges
- Mix concrete according to package directions
- Pour into the form, vibrate to remove air bubbles
- Level the surface and allow to cure (typically 48 hours minimum)
- Remove from form, sand edges, and apply concrete sealer
Countertop Creation
Find all your countertop materials and tools in one place!
Step 5: Install Appliances and Fixtures

Installing the centerpiece of your outdoor kitchen – the grill
Now for the exciting part – adding the functional elements:
- Install your grill or cooktop according to manufacturer instructions
- Connect gas lines if applicable (have connections tested)
- Add storage components like drawers or cabinets
- Install any sinks or refrigeration units
- Secure all components properly to the structure
Find Affordable Appliances
Shop for budget-friendly grills and outdoor kitchen appliances!
Step 6: Finishing Touches
Complete your outdoor kitchen with these final elements:
- Apply weather-resistant finishes to all exposed surfaces
- Install cabinet doors and hardware
- Add lighting for evening cooking and entertaining
- Consider a simple roof or pergola for weather protection
- Arrange seating and dining areas nearby

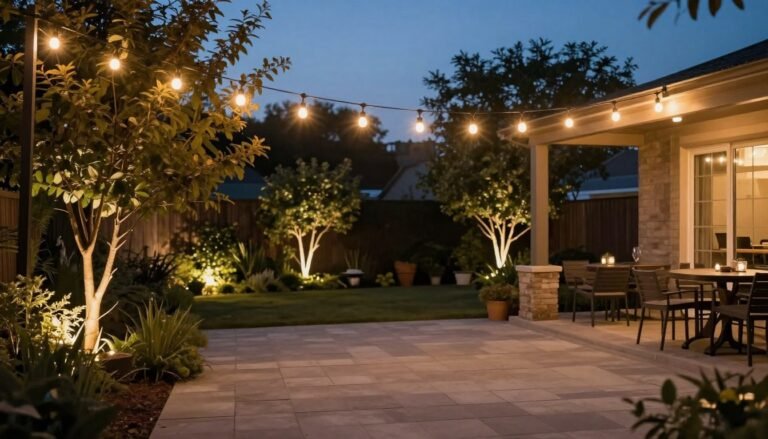
Adding lighting and decorative elements completes your budget-friendly outdoor kitchen
Add the Perfect Finishing Touches
Find lighting, decor, and accessories for your new outdoor kitchen!
Creative Budget-Friendly Outdoor Kitchen Ideas
Looking for inspiration? Here are some innovative approaches to create an outdoor kitchen on a tight budget.

Creative repurposing can create a unique outdoor kitchen with character
Repurposed Material Ideas
Old Dresser Transformation
Find a solid wood dresser at a thrift store, remove drawers as needed for grill placement, seal with weather-resistant finish, and add a heat-resistant countertop. Instant outdoor kitchen storage and prep space!
Cinder Block Masterpiece
Arrange cinder blocks in a U-shape, leaving spaces for wood storage or decorative elements. Top with a concrete countertop and add a freestanding grill. Paint blocks in a fun color for added personality.
Rolling Cart Kitchen
For small spaces or renters, create a mobile kitchen using heavy-duty rolling carts. Add a portable grill, prep space, and storage. Wheel it out when needed and store it away when not in use.
Get Creative with Storage
Find versatile storage solutions for your outdoor kitchen!
Modular Approach: Build in Phases
Can’t afford to build everything at once? Create your outdoor kitchen in stages:

Building in phases allows you to spread the cost over time
Phase 1: Grill Station
Start with just a simple grill counter with minimal prep space. This gives you the essential cooking functionality while you save for additional components.
Phase 2: Add Storage
Expand your kitchen with weather-resistant storage for utensils, dishes, and grilling supplies. This improves functionality without a major investment.
Phase 3: Expand Features
Add a sink, refrigerator, or bar seating area as your budget allows. Each addition increases both the value and usability of your outdoor kitchen.
Start Your Modular Kitchen
Find modular components to build your outdoor kitchen in phases!
Weatherproofing Your Budget Outdoor Kitchen
Protecting your investment from the elements is crucial for longevity, especially when building on a budget. Here’s how to ensure your outdoor kitchen stands the test of time without spending a fortune.

Simple weatherproofing features extend the life of your outdoor kitchen
Affordable Weather Protection Ideas
Simple Overhead Cover
A basic pergola with a weather-resistant canvas, retractable awning, or even a large patio umbrella can provide protection from sun and light rain. For more permanent protection, consider corrugated metal or polycarbonate roofing panels.
Protective Finishes
Apply marine-grade sealants to wooden components, UV-resistant paint to exposed surfaces, and concrete sealer to countertops. These affordable finishes significantly extend the life of your materials.
Custom Covers
Invest in quality covers for your grill and other appliances. For the entire kitchen, consider custom-fitted or DIY covers made from weather-resistant fabric to protect during harsh weather or off-seasons.
Protect Your Investment
Find weatherproofing supplies to keep your outdoor kitchen looking great for years!
“The most expensive part of any outdoor kitchen isn’t building it—it’s replacing it because you didn’t protect it properly from the start. A little investment in weatherproofing saves hundreds or even thousands in the long run.”
Your Budget-Friendly Outdoor Kitchen Awaits
Building an outdoor kitchen DIY on a budget is absolutely achievable with some planning, creativity, and elbow grease. By focusing on essential features, choosing cost-effective materials, and possibly building in phases, you can create a functional and attractive outdoor cooking space without breaking the bank.

The real reward: enjoying your budget-friendly outdoor kitchen with friends and family
Remember that your outdoor kitchen doesn’t need to rival professional installations to be functional and enjoyable. Start simple, focus on quality where it matters most (like the grill and weather-resistant materials), and add features as your budget allows.
Now it’s your turn to create an amazing outdoor cooking space that fits your budget! Be sure to pin this guide for reference during your project, and we’d love to see your budget-friendly outdoor kitchen creations.
Start Your Outdoor Kitchen Project Today!
Find everything you need to build your dream outdoor kitchen on a budget!
How much can I save by building my own outdoor kitchen?
By taking the DIY approach, you can save anywhere from 40-70% compared to hiring professionals. A custom-built outdoor kitchen typically costs $15,000-$25,000, while a DIY version can be completed for $1,500-$5,000 depending on your material choices and features.
What’s the most budget-friendly base material for an outdoor kitchen?
Concrete blocks (cinder blocks) offer the best combination of affordability, durability, and ease of use. At approximately $1-2 per block, you can create a solid structure for a fraction of the cost of custom masonry or prefabricated units. They can also be faced with stone veneer or painted for a more finished look.
Do I need a permit to build an outdoor kitchen?
Permit requirements vary by location. Generally, simple outdoor kitchens without permanent gas, electrical, or plumbing connections may not require permits. However, any installation involving gas lines, electrical work, or plumbing typically requires permits and possibly professional installation. Always check with your local building department before starting your project.