Creating beautiful outdoor spaces doesn’t require expensive contractors or fancy equipment. With basic tools and a bit of creativity, you can transform your backyard into an inviting retreat. DIY outdoor furniture and decorative pieces add personal charm while saving money.
This Website contains affiliate links. That means I may earn a small commission if you purchase through my links, at no extra cost to you.
Wood remains the perfect material for outdoor projects. It’s versatile, affordable, and forgiving for beginners. Whether you’re looking to build a cozy bench or an elaborate pergola, outdoor woodworking projects offer endless possibilities.
This guide showcases practical and inspiring ideas that anyone can tackle. From simple planters to complete patio furniture sets, you’ll find projects matching your skill level and outdoor space needs.
Getting Started with Outdoor Woodworking Projects
Beginning your outdoor woodworking journey requires just a handful of essential tools. Most projects need basic tools you might already own. A circular saw, drill, measuring tape, and square form the foundation of any workshop.
Safety equipment matters just as much as cutting tools. Protect your eyes with safety glasses and your hands with work gloves. A dust mask helps when sanding or cutting treated lumber.
Quality doesn’t mean expensive when starting out. Mid-range tools from reputable brands work perfectly for DIY outdoor projects. As your skills grow, you can upgrade specific tools based on your favorite project types.
Selecting appropriate lumber ensures your outdoor wood projects withstand weather and time. Cedar and redwood naturally resist rot and insects. Pressure-treated pine offers an affordable option for most outdoor applications.
Consider your project’s exposure to elements when choosing materials. Furniture pieces under covered porches can use softer woods. Projects exposed to rain and sun benefit from naturally rot-resistant species.
Budget plays a role in wood selection. Pressure-treated lumber provides excellent value for beginners. Save premium cedar or redwood for visible pieces where appearance matters most.
Simple Patio Furniture for Beginners
Patio furniture projects introduce basic woodworking techniques while creating functional pieces. A simple outdoor table takes just a weekend to build. Basic joinery methods work perfectly for sturdy, long-lasting furniture.
Start with a coffee table or side table before tackling larger pieces. These smaller projects teach essential skills without overwhelming beginners. You’ll learn to make straight cuts, drill pilot holes, and apply outdoor finishes.
DIY Outdoor Coffee Table
An outdoor coffee table serves as an ideal first furniture project. The design uses straightforward construction with minimal cuts. Four legs, a frame, and top boards create a functional piece in just a few hours.
Choose pressure-treated boards or cedar for durability. Cut all pieces to length first, then sand rough edges. Assemble the frame before attaching legs and top boards.
Finish with exterior stain or sealant to protect against moisture. This simple project builds confidence for more complex outdoor furniture designs.
Classic Adirondack Chair
The iconic Adirondack chair combines comfort with timeless style. While the design looks complex, it breaks down into manageable components. Back slats, seat boards, and angled legs create the distinctive silhouette.
Templates simplify cutting the curved back and seat pieces. Take time marking angles accurately before cutting. Proper angles ensure comfortable seating and stability.
Sand all edges smooth before assembly to avoid splinters. Use rust-resistant screws designed for outdoor applications. Apply multiple coats of exterior finish for weather protection.
Ready to Build Professional-Quality Furniture?
Access detailed plans with exact measurements, cut lists, and step-by-step instructions. Transform your outdoor space with beautiful, durable furniture that looks professionally made.
A garden bench provides seating while adding charm to any outdoor space. The basic design requires minimal materials and cuts. Two supports, a seat, and a back create a comfortable resting spot.
This project teaches proper spacing for comfort. Seat height should measure around eighteen inches for easy sitting. Back angle affects comfort significantly.
Add armrests for extra comfort and style. Position armrests at a comfortable height for relaxing. Finish the bench with weather-resistant stain in your preferred color.
Garden Planters and Raised Beds
Planter projects combine functionality with decorative appeal. These outdoor woodworking projects suit any skill level. Simple boxes progress to tiered designs and vertical gardens.
Raised garden beds improve drainage and soil quality. They make gardening easier on your back. Build them to any size matching your space and gardening needs.
Basic Planter Box Design
A rectangular planter box makes an excellent beginner project. Four sides, a bottom, and optional feet create the basic structure. Size your planter based on available space and plant requirements.
Drill drainage holes in the bottom to prevent waterlogging. Space holes every few inches for proper water flow. Line the interior with landscape fabric before adding soil.
Cedar works beautifully for planters due to natural rot resistance. The wood’s natural oils protect against moisture damage. Leave cedar unfinished to develop a silvery patina over time.
Tiered Planter Stand
A tiered design maximizes growing space in small areas. Multiple levels create visual interest while holding various plants. This project requires more cutting but uses simple construction techniques.
Build each tier as a separate box, then attach them to a backing board. Stagger the boxes for easy plant access. The design works perfectly for herbs, flowers, or small vegetables.
Position the stand against a wall or fence for stability. Secure the backing board to the structure behind it. This prevents tipping when plants are watered or during windy weather.
Raised Garden Bed
Raised beds transform any outdoor space into productive growing area. The simple rectangular design uses boards attached to corner posts. Height varies based on gardening preferences and mobility needs.
Twelve to eighteen inches provides adequate soil depth for most vegetables. Taller beds reduce bending and kneeling. Width should allow easy reach to the center from either side.
Fill beds with quality garden soil mixed with compost. The raised design warms faster in spring, extending the growing season. Plants thrive in the loose, well-draining environment.
Create Stunning Garden Features
Discover professional planter designs and raised bed plans that maximize your growing space. Get detailed instructions for building beautiful, functional garden structures.
An outdoor dining table becomes the centerpiece of your patio or deck. These larger projects suit intermediate builders ready to tackle bigger builds. The investment of time pays off with years of outdoor entertaining.
Size your table based on typical guest numbers and available space. A six-foot table comfortably seats six to eight people. Eight-foot tables accommodate larger gatherings.
Farmhouse-Style Dining Table
The farmhouse design features a sturdy base and thick top boards. Breadboard ends add visual appeal and prevent warping. This classic style suits any outdoor decor aesthetic.
Build the base using four-by-four posts and two-by-six bracing. Strong joinery ensures stability for years. The substantial construction supports heavy use and weather exposure.
Top boards can run lengthwise or widthwise depending on your preference. Space boards slightly to allow water drainage. Apply exterior finish to all surfaces, including underneath, for complete protection.
Folding Picnic Table
A folding design offers flexibility for smaller spaces. The table folds flat for storage during winter months. This practical option suits yards with limited room for permanent furniture.
The mechanism uses simple hinges and support brackets. Practice the folding motion during construction to ensure smooth operation. Sturdy hardware prevents accidental folding during use.
Built-in benches eliminate the need for separate seating. Attach benches to the table frame using the same hinge system. The complete unit folds together for convenient storage.
Decorative Outdoor Accents
Small decorative projects add personality to outdoor spaces. These quick builds make perfect weekend projects. They also work well for gift-giving or craft fair sales.
Decorative pieces allow creativity and personal expression. Experiment with different wood species, stains, and paint colors. These accents personalize your outdoor living areas.
Wooden Lantern Holders
Lantern holders create ambient lighting for evening entertainment. The open design safely houses pillar candles or LED lights. Simple construction makes this an afternoon project.
Cut four side pieces and a bottom base. Join corners using wood glue and small nails. Add a handle fashioned from rope or thin wood strips.
Size the opening to fit standard candle sizes. Sand all edges smooth to prevent splinters. Finish with clear sealant to showcase natural wood grain.
Tiered Plant Stand
A small tiered stand displays potted plants at varying heights. The vertical design maximizes limited patio space. Three or four tiers accommodate multiple pots.
Ladder-style construction creates the tiered effect. Each shelf supports small to medium pots. Angle the shelves slightly for visual interest and stability.
Stain the stand to match existing outdoor furniture. Alternatively, paint in bold colors for a contemporary look. Seal all surfaces to protect against moisture damage.
Address Post with Planter
Combine function with beauty in an address post design. The post displays house numbers while the attached planter adds color. This project enhances curb appeal while serving a practical purpose.
Build a sturdy post from four-by-four lumber. Attach a planter box near the top or bottom. Mount weather-resistant house numbers at eye level.
Set the post in concrete for stability. Paint or stain before installation. Plant trailing flowers for a welcoming entrance accent.
Transform Your Outdoor Space Today
Get instant access to hundreds of outdoor wood project plans. From simple accents to complete outdoor rooms, find the perfect project for your skill level and space.
Pergolas define outdoor living spaces while providing partial shade. These larger structures require careful planning and construction. The impressive results justify the extra effort and materials.
A basic pergola uses four posts supporting overhead beams and rafters. Spacing between rafters determines shade coverage. Closer spacing provides more shade.
Freestanding Pergola Design
A freestanding structure offers placement flexibility anywhere in your yard. Set posts in concrete for stability against wind. The substantial foundation supports the overhead weight.
Space posts eight to ten feet apart for balanced proportions. Use six-by-six posts for adequate strength. Cross-beams connect posts at the top.
Rafters run perpendicular to beams, creating the characteristic grid pattern. Space rafters twelve to sixteen inches apart. This spacing provides attractive shade while allowing air circulation.
Attached Patio Pergola
An attached design connects to your house, extending living space outdoors. One side attaches to a ledger board mounted on the house. The other side uses posts set in the ground.
Match the pergola style to your home’s architecture. Use similar materials and finishes for a cohesive look. Coordinate roof line angles with existing structures.
Train climbing plants like wisteria or grapevines over the structure. Living coverage increases shade while adding natural beauty. The combination creates a true outdoor room feeling.
Simple Shade Sail Frame
Posts supporting a shade sail offer a modern alternative to traditional pergolas. The minimalist design suits contemporary outdoor spaces. Installation takes less time than full pergola construction.
Set three or four posts in strategic positions. Height variations create an attractive angled canopy. Attach heavy-duty eye bolts at the top of each post.
Stretch a weather-resistant shade sail between posts. The fabric provides excellent sun protection while allowing breezes through. Replace sails easily when worn or to change colors.
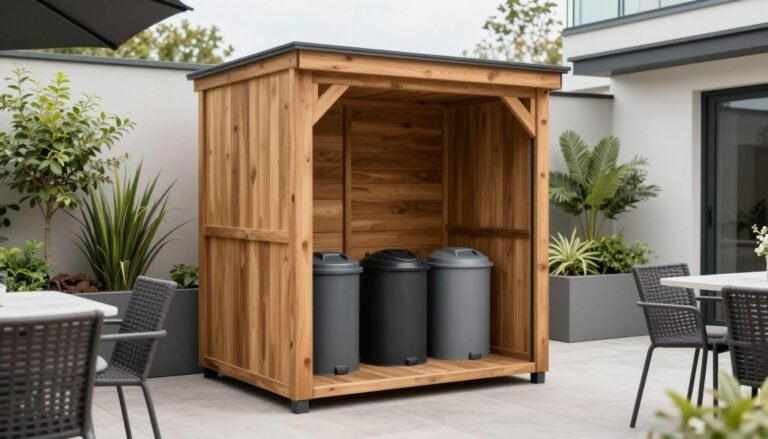
Outdoor Storage Solutions
Storage projects keep outdoor spaces organized and tidy. DIY outdoor furniture with built-in storage maximizes functionality. These practical builds serve dual purposes.
Weatherproof storage protects cushions, tools, and toys from rain and sun. Proper ventilation prevents mold and mildew inside enclosed spaces. Plan adequate room for intended items.
Storage Bench Design
A storage bench combines seating with hidden storage space. The hinged seat lifts to reveal storage underneath. This dual-purpose piece works perfectly on porches or patios.
Build a basic box frame with a hinged lid. Add legs or a solid base depending on your style preference. Install soft-close hinges to prevent lid slamming.
Size the interior to accommodate seat cushions during winter storage. Add weather stripping around the lid for better moisture protection. Drill small ventilation holes in the back panel.
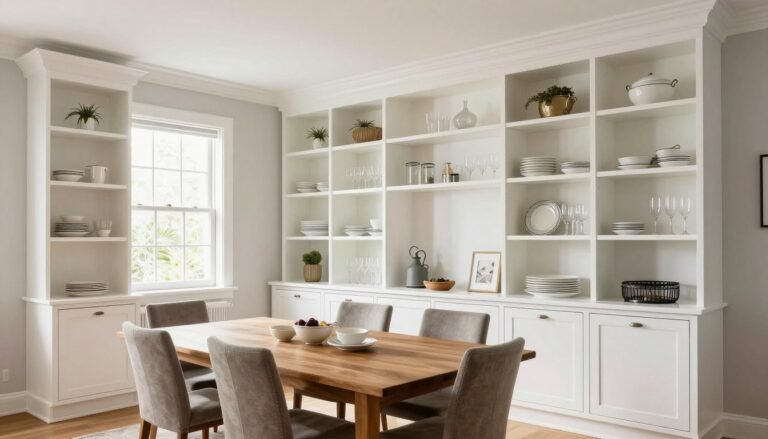
Garden Tool Organizer
A wall-mounted organizer keeps garden tools accessible and organized. The vertical design saves floor space in sheds or garages. Custom slots hold specific tools securely.
Create slots or hooks for rakes, shovels, and hand tools. Space them according to tool sizes. A lower shelf holds pots, gloves, or small hand tools.
Mount the organizer securely to wall studs. Add a small roof overhang if mounting outside. Paint or stain to match your garden aesthetic.
Firewood Storage Rack
A dedicated firewood rack keeps logs dry and organized. The open design allows air circulation for proper seasoning. Build the rack near your fire pit or fireplace.
Use pressure-treated lumber for the base and frame. Slats on the bottom keep wood off the ground. A small roof protects the top layer from rain.
Size the rack based on winter firewood needs. Multiple smaller racks offer flexibility in placement. Stack wood bark-side up for better water shedding.
Build Smart Storage Solutions
Organize your outdoor space with professional storage plans. Get detailed blueprints for benches, sheds, and organizers that maximize space while adding beauty.
Deck railings provide safety while defining outdoor spaces. Custom railings transform basic decks into designer features. The project requires precision but produces impressive results.
Check local building codes before starting railing projects. Height requirements and spacing regulations ensure safety. Most codes require thirty-six to forty-two inch railing height.
Horizontal Cable Railing
Cable railings offer a modern look with minimal view obstruction. Stainless steel cables stretch between wooden posts. The sleek design suits contemporary outdoor spaces.
Set posts securely in the deck frame. Space them no more than four feet apart for proper cable tension. Drill precise holes for cable passage through posts.
Thread cables through posts and secure with specialized fittings. Tighten each cable evenly for consistent appearance. The finished railing provides safety without blocking views.
Classic Baluster Design
Traditional balusters create timeless appeal. Vertical spindles between top and bottom rails form the classic pattern. This style suits traditional home architecture.
Cut all balusters to identical length for uniform appearance. Space them according to code requirements, typically four inches maximum gap. Pre-drill holes to prevent splitting during installation.
Secure balusters with deck screws from underneath for hidden fasteners. Apply exterior stain or paint to match deck flooring. Regular maintenance keeps railings looking fresh.
Decorative Post Caps
Post caps add finishing touches to railing systems. The small details elevate overall design quality. Options range from simple beveled caps to elaborate carved designs.
Choose caps sized to match your post dimensions. Secure with construction adhesive and finishing nails. Copper or solar-powered light caps add functional illumination.
Coordinate cap style with railing design for cohesive appearance. Stain or paint caps to match or contrast with posts. These final touches complete the professional look.
Fire Pit and Seating Areas
Fire pit areas create gathering spaces for family and friends. Surrounding seating makes the space functional for entertaining. These outdoor projects extend the outdoor season into cooler months.
Plan seating arrangement around the fire pit. Leave adequate space for safe distance from flames. Consider adding built-in benches or moveable chairs.
Built-In Fire Pit Benches
Permanent benches surrounding the fire pit provide ample seating. The built-in design creates a defined gathering area. Back support adds comfort for extended conversations.
Build benches in a semi-circle or square arrangement. Set posts in concrete for stability. The substantial construction withstands weather and heavy use.
Space benches far enough from fire for safety and comfort. Add storage underneath seats for firewood or outdoor supplies. Finish with weather-resistant stain.
Corner Bench Seating
L-shaped corner benches maximize seating in smaller spaces. The design fits neatly into deck or patio corners. Built-in armrests define individual seating spaces.
Frame the basic box structure first. Add seat slats with small gaps for water drainage. Back supports angle slightly for comfortable leaning.
Include cushion storage beneath lift-up seats. Weather-resistant cushions increase comfort significantly. The complete unit serves multiple functions.
Moveable Lounge Chairs
Individual chairs offer flexible seating arrangements. Build several matching pieces for cohesive look. The portable design allows rearranging as needed.
Adirondack-style chairs work well around fire pits. The reclined design promotes relaxation. Wide armrests hold drinks or snacks.
Consider adding ottoman-style footrests for ultimate comfort. Match stain colors across all pieces. The complete set creates an inviting outdoor room.
Create the Perfect Gathering Space
Design beautiful fire pit areas and outdoor seating that bring family together. Access professional plans for benches, chairs, and complete outdoor entertaining spaces.
A potting bench provides dedicated workspace for garden tasks. The organized station keeps supplies accessible. These outdoor woodworking projects combine form and function beautifully.
Design your potting bench based on gardening habits and available space. Include shelving for pot storage and supplies. A comfortable work height prevents back strain during tasks.
Classic Potting Bench Design
The traditional design features a solid work surface at waist height. Upper and lower shelves provide ample storage. A backsplash prevents soil from falling behind the bench.
Build the frame using four-by-four posts and two-by-four cross-supports. Add a solid top surface using one-by-six boards. Mount a pegboard backsplash for hanging tools.
Include hooks for frequently used hand tools. Open lower shelving stores bags of soil and large pots. The organized setup streamlines gardening tasks.
Compact Garden Station
Smaller spaces benefit from a streamlined design. A narrow bench fits along fences or walls. Vertical storage maximizes the compact footprint.
Use two-by-four framing for lighter construction. A fold-down work surface saves space when not in use. Wall-mounted tool holders keep essentials within reach.
Add a small potting soil bin with a hinged lid. Include a shallow drawer for seed packets and labels. The efficient design accommodates serious gardening in minimal space.
Mobile Garden Cart
A wheeled cart brings supplies wherever needed. The portable design suits large properties or varied garden locations. Sturdy casters handle outdoor terrain.
Build a basic two-shelf cart with handles. Add sides to prevent items from falling off during movement. Heavy-duty wheels navigate grass and gravel paths.
Include a fold-out work surface for on-location potting. Tool hooks and bins keep supplies organized. The mobile station eliminates trips back and forth to storage.
Privacy Screens and Outdoor Dividers
Privacy screens define spaces while blocking unwanted views. These structures create intimate outdoor rooms. The vertical design adds architectural interest to yards and patios.
Screen height and opacity depend on privacy needs. Solid boards block views completely. Spaced slats allow air flow while obscuring sight lines.
Slatted Privacy Wall
Evenly spaced vertical slats create modern privacy screens. The design allows breeze passage while blocking direct views. Stain in bold colors for contemporary appeal.
Build a frame using four-by-four posts set in concrete. Attach horizontal rails between posts. Mount vertical slats to the rails using consistent spacing.
Space slats based on desired privacy level. Two to three inch gaps provide good screening while maintaining airflow. Wider spacing creates a more open feeling.
Lattice Panel Screen
Pre-made lattice panels simplify construction. The crisscross pattern adds visual texture. Climbing plants quickly cover lattice for natural privacy.
Frame lattice panels with two-by-four trim for finished edges. Mount panels between posts or attach to existing fences. Paint the frame to match or contrast with lattice.
Plant fast-growing vines like clematis or morning glory. The living coverage increases privacy while adding color. Regular training keeps growth directed upward.
Horizontal Plank Fence
Horizontal boards create clean, contemporary lines. The style suits modern home architecture. Staggered boards add visual interest while maintaining privacy.
Set posts six to eight feet apart. Attach horizontal boards to posts using hidden fasteners for clean appearance. Alternate board spacing for a dynamic pattern.
Leave the top open or add a decorative cap rail. Seal all wood surfaces to prevent warping. The modern design elevates outdoor living spaces.
Design Private Outdoor Retreats
Create beautiful privacy solutions with professional plans for screens, dividers, and decorative fencing. Transform your outdoor space into a secluded paradise.
Outdoor play structures encourage active play and imagination. These rewarding outdoor wood projects create lasting family memories. Safety considerations guide design and construction choices.
Build structures appropriate for children’s ages and abilities. Use smooth, splinter-free lumber. Round all sharp edges and corners for safety.
Simple Sandbox Design
A basic sandbox provides hours of creative play. The simple box design takes just an afternoon to build. Add a cover to keep sand clean and dry.
Size the sandbox at least four feet square for adequate play room. Use two-by-eight or two-by-ten boards for sides. Secure corners with deck screws.
Line the bottom with landscape fabric to prevent weed growth. Drill small drainage holes in corners. Fill with play sand specifically designed for sandboxes.
Picnic Table for Kids
A scaled-down picnic table fits young children perfectly. The attached benches provide stable seating. Use the same basic design as adult tables but smaller dimensions.
Build the table at appropriate height for preschool and elementary ages. Sand all surfaces exceptionally smooth. Round edges and corners generously.
Apply bright, non-toxic exterior paint for kid appeal. Seal thoroughly to prevent splinters. The colorful table becomes a favorite outdoor activity spot.
Simple Playhouse Base
A ground-level playhouse offers imaginative play space. The basic platform and frame support walls and roof. Children customize the interior for endless play scenarios.
Build a solid platform frame at ground level. Add wall frames with window openings. A simple gable roof completes the structure.
Include a small porch or deck area. Add window boxes for play gardening. Paint in bright colors or leave natural for different aesthetics.
Outdoor Bars and Serving Stations
An outdoor bar elevates entertaining capabilities. These impressive DIY outdoor furniture pieces serve as focal points for gatherings. The project combines substantial construction with finishing details.
Design bars to suit your entertaining style and space. Include adequate counter space for drink preparation. Storage shelves hold supplies and glassware.
Pallet Bar Design
Repurposed pallets create rustic outdoor bars economically. The weathered wood adds character. Minimal additional lumber completes the structure.
Stand pallets on end to form the bar face. Add a solid top using two-by-six boards. Attach a backing and add shelves inside for storage.
Sand pallet wood thoroughly to remove rough spots. Seal with exterior finish to prevent splinters. Add hooks underneath for hanging bar tools.
Built-In Deck Bar
Integrate a bar into deck railing for space efficiency. The built-in design uses existing structure for support. A fold-down counter provides flexibility.
Mount a sturdy ledger board to deck posts. Add a hinged counter that folds up when not needed. Include chain or cable supports to hold the counter level.
Install small shelves on the inside for bottle storage. Add hooks for glasses and utensils. The compact design works perfectly for small decks.
Rolling Bar Cart
A wheeled cart offers ultimate flexibility for outdoor entertaining. Move the bar wherever guests gather. The portable design simplifies setup and storage.
Build a two or three-tier cart with sturdy casters. Include a solid top surface for drink preparation. Lower shelves store bottles and supplies.
Add handles for easy maneuvering. Install a wine glass rack underneath the top shelf. The mobile station makes outdoor hosting effortless.
Become a Master Outdoor Builder
From beginner projects to advanced structures, access thousands of professional woodworking plans. Build anything for your outdoor space with step-by-step guidance.
Vertical gardens maximize growing space in small yards. These space-saving outdoor projects add visual interest to walls and fences. The design brings gardens to eye level.
Choose plants suited for vertical growing. Herbs, lettuces, and flowers work exceptionally well. Consider sun exposure when selecting plant varieties.
Ladder Garden Stand
A ladder-style frame holds multiple small planters. The angled design provides stability. Each shelf accommodates pots or built-in planter boxes.
Build the ladder frame from two-by-fours. Space shelves twelve to eighteen inches apart. Attach shelves securely to the angled sides.
Size shelves to hold standard nursery pots. Alternatively, build small planter boxes that slide onto shelves. The versatile design allows seasonal plant changes.
Wall-Mounted Planter Grid
Individual planter boxes mounted in a grid pattern create living art. The modular design allows custom arrangements. Add or remove boxes as plants change seasonally.
Build small planter boxes from cedar or redwood. Drill drainage holes in each bottom. Mount sturdy brackets on wall or fence backing.
Arrange boxes in symmetrical or random patterns. Mix plant varieties for color and texture contrast. The living wall becomes a stunning focal point.
Gutter Garden System
Repurposed rain gutters create efficient growing channels. The horizontal design suits herbs and lettuce perfectly. Multiple rows maximize vertical space.
Mount gutter sections horizontally to a wall or fence. Drill drainage holes every few inches. Cap ends to contain soil and plants.
Space rows twelve inches apart for adequate growing room. The system works well for succession planting. Harvest outer leaves while plants continue growing.
Finishing and Protecting Outdoor Wood Projects
Proper finishing protects outdoor wood projects from weather damage. The right products extend project life significantly. Take time with finishing for best results.
Surface preparation determines finish quality. Sand all surfaces smooth before applying products. Remove dust completely with tack cloths.
Stain Application Techniques
Exterior stain enhances wood grain while providing protection. Oil-based stains penetrate deeply for long-lasting results. Apply with brushes, rags, or sprayers.
Test stain color on scrap wood first. Allow adequate drying time between coats. Two coats provide better protection than single heavy applications.
Wipe excess stain before it dries. Uneven absorption creates blotchy appearance. Consistent application technique produces professional results.
Sealant and Water Repellent
Clear sealants protect wood while maintaining natural appearance. Water repellents prevent moisture damage and rot. Reapply sealants annually for continued protection.
Choose products designed specifically for outdoor use. Marine-grade sealants offer superior protection. Apply thin, even coats for best absorption.
Pay extra attention to end grain, which absorbs moisture readily. Multiple coats on ends prevent water infiltration. Proper sealing extends wood life dramatically.
Paint for Outdoor Projects
Exterior paint provides complete coverage and color options. Prime bare wood first for better adhesion. Quality paint reduces maintenance frequency.
Apply paint in thin, even coats. Multiple thin coats outlast single thick applications. Allow complete drying between coats.
Paint protects wood from UV damage and moisture. Touch up nicks and scratches promptly to prevent deterioration. Regular maintenance keeps projects looking fresh.
Master Every Building Technique
Learn professional finishing techniques and construction methods. Access video tutorials, detailed plans, and expert tips that guarantee project success every time.
Regular maintenance preserves outdoor wood projects for years. Seasonal care prevents major repairs. Simple tasks protect your investment of time and materials.
Inspect projects each spring for winter damage. Check for loose fasteners, cracked boards, or finish deterioration. Address small issues before they become larger problems.
Spring Preparation
Clean projects thoroughly after winter. Remove dirt, mildew, and debris. Use a mild cleaner and soft brush to avoid damaging wood.
Inspect finish condition and reapply where needed. Touch up bare spots immediately. Fresh finish prevents moisture infiltration.
Tighten any loose screws or bolts. Check structural connections for soundness. Replace damaged boards promptly to prevent further deterioration.
Summer Care
Monitor projects during heavy use season. Clean spills and stains immediately. Regular cleaning prevents permanent discoloration.
Check shaded areas for mildew growth. Treat affected spots with appropriate cleaners. Good air circulation helps prevent mildew problems.
Inspect cushions and fabric elements for wear. Store cushions during rainstorms. Proper care extends fabric life significantly.
Fall and Winter Protection
Apply fresh sealant before cold weather arrives. Extra protection helps wood survive harsh winter conditions. Focus on horizontal surfaces that collect water.
Store removable pieces in dry locations. Cover large furniture with waterproof tarps. Proper storage prevents unnecessary weather exposure.
Remove snow accumulation promptly. Excess weight can damage structures. Keep drainage areas clear to prevent ice buildup.
Budget-Friendly Project Tips
Beautiful outdoor projects don’t require huge budgets. Smart planning stretches dollars further. Several strategies reduce costs without sacrificing quality.
Shop lumber sales and clearance sections. End-of-season sales offer significant savings. Buy materials as budget allows for larger projects.
Reclaimed and Repurposed Materials
Salvaged wood creates unique character at low cost. Old fence boards, pallet wood, and barn wood work beautifully. Clean and prepare reclaimed lumber carefully.
Check construction sites for usable cutoffs. Many contractors discard perfectly good pieces. Always ask permission before taking materials.
Estate sales and online marketplaces offer deals on used lumber. Inspect carefully for rot or insect damage. Salvaged materials add authentic rustic charm.
Simplified Designs
Basic designs use fewer materials and less time. Simple projects look just as attractive as complex builds. Focus on clean lines and proper proportions.
Skip elaborate joinery in favor of straightforward connections. Pocket screws and simple butt joints work perfectly for most outdoor projects. Reserve complex techniques for visible areas.
Build smaller versions of large projects. Scale down dimensions while maintaining functionality. Smaller projects require less material investment.
Tool Sharing and Borrowing
Borrow or rent expensive tools for one-time use. Tool libraries and rental centers offer affordable access. Share equipment costs with fellow DIY enthusiasts.
Join woodworking clubs or community workshops. Shared facilities provide tool access without ownership costs. Learn from experienced members simultaneously.
Invest gradually in quality tools. Buy essential items first. Add specialized tools as skills and project ambitions grow.
Start Building Your Outdoor Oasis Today
Outdoor wood projects transform ordinary yards into extraordinary living spaces. Each completed project builds skills and confidence. The journey from beginner to accomplished builder happens one project at a time.
Start with simple designs matching your current skill level. Success with basic projects encourages tackling more complex builds. Every project teaches valuable lessons.
The rewards extend beyond beautiful outdoor furniture and structures. Time spent building creates lasting satisfaction. Handmade pieces carry meaning store-bought items never match.
Your outdoor space deserves personal touches reflecting your style and needs. DIY outdoor projects make that vision affordable and achievable. The tools and techniques covered here provide everything needed to begin.
Take that first step today. Choose a project that excites you. Gather materials and tools. The transformation of your outdoor space starts with a single cut.
Access Your Complete Project Library
Stop searching for plans and start building. Get instant access to thousands of professional outdoor woodworking plans, video tutorials, and expert guidance. Transform your outdoor space with confidence.